Filtering image noise
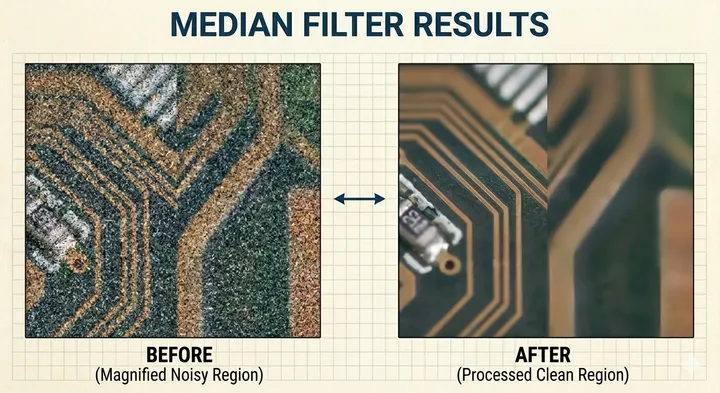
Image noise
This is a random variation of brightness or color information in images. It can originate from film grain and from the unavoidable shot noise of an ideal photon detector.
If you are into cameras and photography, you can notice this effect when you try to shoot an image with a high ISO — the sensor will brighten the image but it will also add some noise to the photo. You can see some examples of using High ISO in this article: Dealing with Noise: Salvaging a Severely Underexposed High ISO Image
These are some kinds of noise in images:
- Gaussian noise (most common):
- Looks like subtle grain spread across the whole image
- Salt-and-pepper noise:
- Random pixels become pure black or pure white
- Poisson noise:
- It looks like grain, but not uniform
There are more kinds of noise, but I will talk about those later.
Taking a look at the next image, you can notice it has random black and white pixels, so based on that I can assume it has Salt-and-pepper noise.

Noise can be removed from images using filters.
Removing salt and pepper noise
Since you already know what a kernel is and how images work, you can remove the noise from an image.
Noise can be filtered using mathematics. For salt-and-pepper noise, the median filter is a great tool.
Median filter
This filter uses the median value in a kernel of numbers.
Let’s suppose we have this kernel:
If we write down those numbers the current order is:
The goal of the median filter is to get the median value and put it in the central pixel. Sorting by ascending value, the order of numbers is:
Since we need to change the central pixel of the kernel it should be now:
As you may remember from the previous article, we need to do this for all of the pixels in the image, sliding the kernel like this:

Implementation of median filter
For this implementation, I am going to use numpy since this library allows you to handle arrays easily, and Image from PIL to load the image and save it. I will try to keep the implementation with a minimum number of libraries, and by default the kernel will be 3*3.
import numpy
from PIL import Image
The first step is to load the image. I am going to use the image above named albert_einstein_noise.png. As you can see, that image is a grayscale image so there is no color. In case you have a color image, you will have to use the .convert("L") function; otherwise, you can remove that part.
image = Image.open("albert_einstein_noise.png").convert("L")To be able to do the math and get the median, I need to convert the image to numbers; numpy allows you to do that by just passing the image.
image_numbers = numpy.array(image)If I print the value of image_numbers I get this:
array([[255,  49, 255, ...,  53,  53,  53],
       [ 50,  48,  51, ...,  50, 255,  48],
       [ 49, 255,  49, ...,  49,  46,  46],
       ...,
       [ 33,  31,   0, ...,  32,  32,  32],
       [ 34,  33,  34, ...,  35,  37,  32],
       [ 37,  35, 255, ..., 255,  37,  30]], dtype=uint8)
Every number represents a pixel of the image.
Now that I have a huge matrix with the values of the image, I need to create another array where I am going to save the values of the median filter.
.shapereturns the size in a numpy array, sinceimage_numbersis numpy array I can use that function.numpy.zerosallows to create an array and initialize the value to 0
This code gets the current loaded image and creates a new array but 2 less pixels width and 2 less pixels height.
h, w = image_numbers.shape
output = numpy.zeros((h - 2, w - 2), dtype=numpy.uint8)
You might be wondering why 2 less pixels for height and width, and that’s because, if you remember, the kernel always changes the central pixel, so the edges and corners are never really touched. There are algorithms to fix this, but that will be addressed later.
Now the funniest part is to create the kernel and get the median for the whole image.
"""
Starts from the second element in the array and finishes in the second to last element in the array.
"""
for i in range(1, h - 1):
    for j in range(1, w - 1):
        """
        This creates the kernel with the values of the current iteration:
            i is for the Y axis (row)
            j is for the X axis (column)
        """
        window = [
            image_numbers[i-1, j-1], image_numbers[i-1, j], image_numbers[i-1, j+1],
            image_numbers[i,   j-1], image_numbers[i,   j], image_numbers[i,   j+1],
            image_numbers[i+1, j-1], image_numbers[i+1, j], image_numbers[i+1, j+1]
        ]

        """
        'window' variable is an array that has all the values of the kernel and numpy.median will get the median value in that array.
        """
        output[i-1, j-1] = numpy.median(window)
Remember output is an array and to be able to display the image with the Image library you can use fromarray and pass the new array.
Image.fromarray(output)You can save it by adding .save() and passing the name you want and remember to add the extension like .png or .jpg.
Image.fromarray(output).save("yourname.png")The new generated image is this:

If you compare them side by side, you will see the difference.